Installing a water tank below ground level offers a lot of advantages to any home owner. It saves space, because your tank roof can double up as a car park. It can also offer you more storage, since you can fit a larger tank than you might have on the surface. One limitation is tank maintenance, since underground tanks aren’t as easy to access.
Fortunately, the installation process is fairly simple. Start by deciding the size and type of tank that you want. Plastic tanks have to be lowered into place, while concrete tanks are often poured into their permanent position, cured, then filled with water and covered with a metal lid for additional reinforcement. Sometimes concrete tanks are moulded as separate parts then transported to your home and assembled.
As you do your calculations, consider the weight of the water, not just the tank. There have been cases where empty (plastic) tanks were installed on the roof of a house and once the tanks were filled, they collapsed the entire home. If this happened with an underground tank, the collapsed underground surface could damage all nearby buildings.
Also, check with your local council to see if there are any underground utility lines or sewer pipes that you need to avoid. Here are the basic steps for installing a polyethylene underground tank, or a pre-assembled concrete in-ground tank.
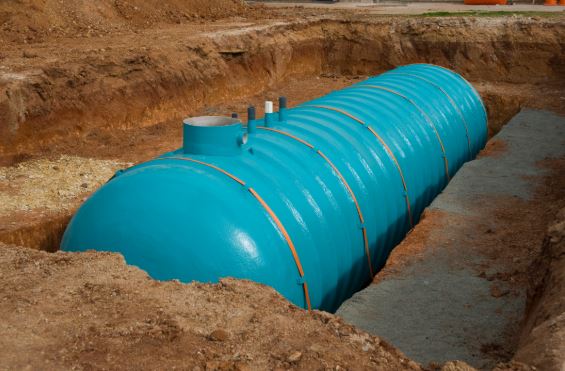
Step 1: Dig a hole
The hole should be the size of the tank plus 50 to 60cm on all sides. You can choose to have the lid of the tank at ground level, or 15cm to 75cm below ground level, but no deeper.
Step 2: Seal the ground
A 15cm layer of reinforced cement concrete (RCC) will do fine. RCC contains steel bars, plates, or wires for added stability and strength. If you don’t want RCC, you can lay 30cm of compact sand instead, making sure it’s flat.Make sure the ground is completely level, because any tilt could tip the tank and the weight of water pushing to one side could burst it.
Step 3: Lower the tank
Do this gently using a crane of forklift so that you don’t crack or pierce the tank. Once the tank is in place, fill it a quarter way full, ensuring it doesn’t move out of its position.
Step 4: Start backfilling
Refill the hole gradually up to the water level. This helps hold the tank in place as the water moves. Backfill should be a mixture of soil, sand, and gravel. The gravel should be smooth and rounded to avoid perforating the tank. Press down the backfill to keep it compact.
Step 5: Alternate filling and backfilling
Add water up to the halfway mark, then backfill to the halfway mark. Press the backfill down before adding water to the three-quarter-way mark and topping up the backfill to the same level, making sure there are no gaps or air spaces in the backfill.
Step 6: Fix the plumbing
Install inlet and outlet pipes, floating devices, valves, gauges, air vents, and pumps. They should be inserted at the top portion of the tank, though pipes and foot valves can be slipped in and pushed to the bottom of the tank.
Step 7: Cover the tank
Fill the tank with water and hold it in place with the final backfill. If you wish, you can add a layer of RCC at the top, but don’t pour concrete on the lid. It needs room to easily open and close for maintenance purposes.
Step 8: Seal the lid
Use silicone and waterproof materials so that runoff from the surface doesn’t contaminate tank water. If you like, you can cover the lid with backfill that’s a maximum of 75cm from the surface. This backfill shouldn’t have clay, steel, or wood that might damage the tank.
This whole process should take less than a day, though you should check the weather reports and try to get everything done when it isn’t raining. Rainwater could disrupt the process by saturating the backfill and compromising the position of the tank.
Read Also: